Request Launcher
Table of contents
Introduction
Terminology
What Request Launcher gives your organisation
Where to manage launchers
How to build a Request Launcher
How to display Request Launcher widget on a dashboard
What end users see and do
How to use Request Launcher with HelpDesk users
Roles and permissions
Corner situations
Summary
Related articles
Introduction
Request Launcher is a configurable request hub you place on a dashboard. It shows request groups on the left and request cards on the right, so people find the right form in two clicks instead of guessing whom to email.
This article explains what Request Launcher is, who can create one, how to build it, and how to display it on any dashboard. It is written for administrators and team leaders who configure the feature, and the section on the end-user view is written for the people who submit requests.
Request Launcher is not limited to IT support. Any team that receives requests, such as HR, finance, facilities, or procurement, can use it as a single entry point for incoming work.
Terminology
Easy8 distinguishes two objects. Keep them apart when you configure the feature.
- Request Launcher is the request hub itself, meaning its groups and their links. You create and manage launchers centrally and you can create as many as you need.
- Request Launcher widget is the dashboard widget that displays a launcher. When you add the widget to a dashboard, you select which launcher it shows.
Because the launcher is managed centrally, one launcher can appear on several dashboards through several widgets. When you change the launcher, the change applies everywhere it is displayed.
Inside a launcher, a group is one entry in the left-hand menu and a link is one card in the right panel. The interface uses the buttons Add group and Add link for both.
What Request Launcher gives your organisation
This section explains the purpose of the feature, so you can decide whether it fits your setup.
Without a request hub, people either search through a long list of forms, or they fall back to email and phone calls. Both options cost time and leave requests untracked.
Request Launcher addresses this:
- Single known destination: people remember one place to go instead of remembering whom to contact for each type of request.
- Guided request entry: each card opens a form prepared for that specific request type, so the requester provides the information the handling team needs.
- Trackable requests: requests entered through the launcher become standard tasks, which keeps them reportable and auditable instead of hidden in mailboxes.
- Reusable configuration: one launcher can serve several dashboards, so an intranet dashboard and a HelpDesk portal dashboard can share the same request structure.
Delivery expectations and response times are not part of the launcher itself. They come from the task templates, projects, and HelpDesk SLA settings behind the individual links. Configure them there.
Where to manage launchers
You reach launcher management from these places:
- Administration >> Dashboard customization >> Request Launchers, the section on the path /easy_pages
- HelpDesk >> Request launchers, the section on the path /easy_request_launchers
- The Global menu, in the Service section
- The Manage request launchers link shown in the Request Launcher widget in dashboard edit mode, if you have at least the Manage own request launchers permission
All entry points open the same list of launchers.
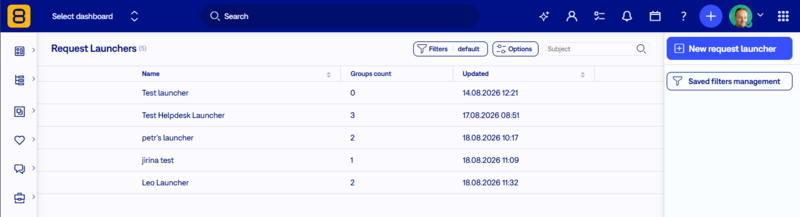
Picture shows the Request Launchers list. The table has the columns Name, Groups count, and Updated, with one row per launcher. In the top-right corner is the blue New request launcher button, and above the table are the Filters, Options, and search controls.
How to build a Request Launcher
Follow these steps to create a launcher your users can work with. The result is a saved launcher that you can then place on any dashboard.
- Open launcher management from one of the places listed above.
- Click New request launcher.
- Enter the launcher Name. This name identifies the launcher when you select it in the widget, and it is shown as the widget heading.
- Click + Add group and enter the group Name. Groups form the left-hand menu, so use names your requesters recognise, for example Incident Management or Request Management.
- Click + Add link to add a card into the group. Each link is one card in the right panel.
- Fill in the link details: Icon, Title, Description, and Action type. The description tells the requester what the form is for before they open it.
- Choose the Action type:
- URL – opens the entered address in a new browser tab.
- Task template – opens the form for a new task prefilled from the selected template.
- Reorder groups and links by dragging them with the handle on their left side.
- Click Save to store the whole launcher. Save and Back apply to the entire launcher, not only to the section with links.
Use the pencil and bin icons on a group to rename or delete it, and the bin icon in the top-right corner of a link card to delete that link.
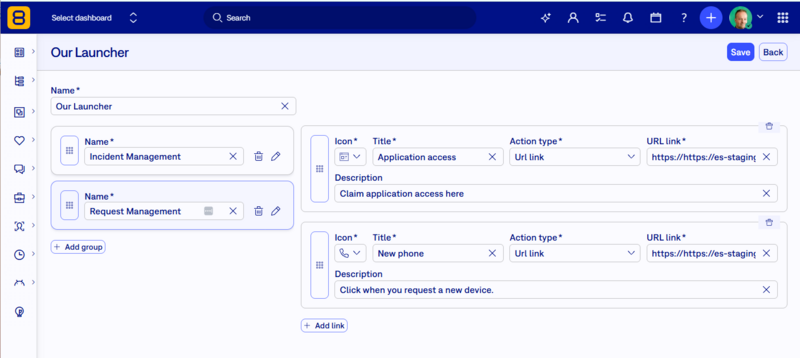
Picture shows the launcher edit form. At the top is the launcher Name field, with the Save and Back buttons in the top-right corner. The left column lists the groups, each with a drag handle, a Name field, and icons for deleting and editing, followed by the + Add group button. The right column shows the link cards of the selected group, each with a drag handle and the fields Icon, Title, Action type, URL link, and Description, followed by the + Add link button.
Good to know: the form behind a Task template link is the task template itself. To change which fields the requester fills in, edit the task template, not the launcher.
How to display Request Launcher widget on a dashboard
This section explains how end users get to see the launcher you built.
- Open the dashboard where the launcher should appear and switch it to edit mode.
- Add the Request Launcher widget from the widget list.
- Select the launcher you want the widget to display from the Request Launcher drop-down.
- Save the widget, then save the dashboard.
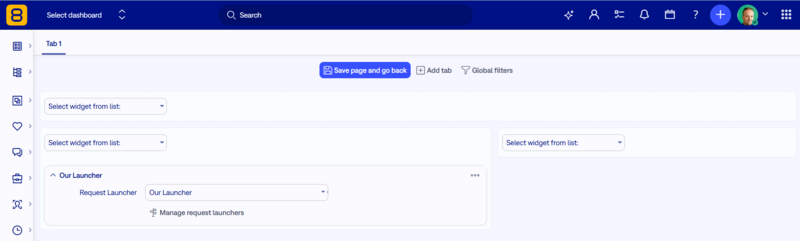
Picture shows a dashboard in edit mode with the Request Launcher widget added. The widget contains the Request Launcher drop-down with the selected launcher, and below it the Manage request launchers link. The dashboard controls Save page and go back, Add tab, and Global filters are at the top of the page.
The widget then shows the selected launcher. You can add the widget to any dashboard in Easy8, not only to a HelpDesk portal dashboard. Adding the same launcher to several dashboards keeps the request structure consistent across teams.
What end users see and do
Use this section when you explain the feature to your requesters.
- Open the dashboard containing the Request Launcher widget.
- Select a group in the left menu. The right panel switches to the cards of that group. The number next to each group name is the count of links it contains, and the All entry lists the links from every group.
- Read the card title and description, then click the card that matches your request. You can also use the Search field at the top of the widget to find a card by its title. [VERIFY: does the search field filter across all groups, or only within the selected group?]
- Continue based on the action behind the card:
- Url link card: the target page opens in a new browser tab.
- Complete the form and submit it. From this point the request follows the standard task and HelpDesk workflow.
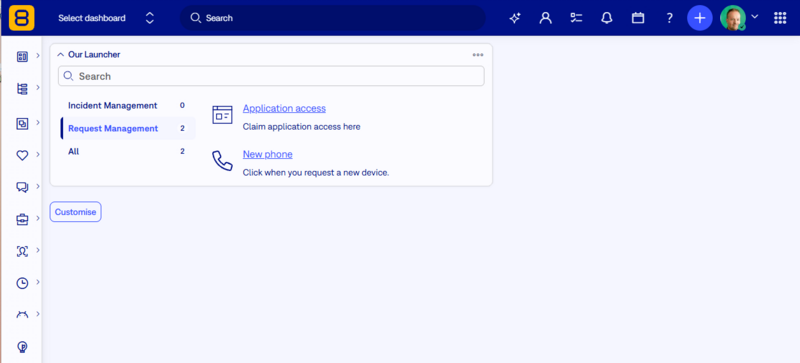
Picture shows the Request Launcher widget on a dashboard as end users see it. Under the widget heading is a Search field. The left column lists the groups with the number of links in each and an All entry; the right column shows the cards of the selected group, each with an icon, a title as a link, and a description below it.
How to use Request Launcher with HelpDesk users
This use case works differently from a launcher used by regular users, so read it before you build a launcher for a HelpDesk portal.
- A HelpDesk user can only create tasks in the projects they are allowed to access through their workspace.
- They can create a task from scratch using the form, or have the form prefilled from a task template.
- A task template can have a project set, or the project can be left blank. What happens depends on which case applies:
- If the project is blank → the template fills out the form, and the HD user can pick which project to create the task in (but only from the ones allowed in the workspace).
- If the project is set and matches one of the workspace projects → the template fills out the form, and the HD user can’t change the project, since it’s already pre-filled from the template.
- If the project is set, but doesn’t match any of the workspace projects → the template doesn’t get applied at all, the HD user just gets an empty form and can pick the project, just like if no template was selected.
Because a template with a blank project adapts to the workspace, you can keep one general template, for example for reporting a bug, and reuse it in several launchers.
Roles and permissions
Set the permissions in Administration >> Roles and permissions >> select a role >> Global permissions. Two global permissions relate to Request Launcher:
- Manage own request launchers: manage only the launchers where you are the author. This permission is enabled for all users by default, so the feature is available without an administrator setting anything up.
- Manage all request launchers: manage the launchers of all authors.
Beyond these two permissions:
- Selecting a launcher in the widget is not restricted.
- The visibility of a launcher displayed on a dashboard is not restricted either.
- A HelpDesk user can only use a launcher displayed on their own personal dashboard, which is the portal. They have no access to the configuration.
Corner situations
Know these limits before you design your launcher structure.
- Two levels only. A launcher supports groups and links inside them. Subgroups, meaning a third level, are not available. Split the content into more groups instead of nesting.
- No approval or workflow logic in the launcher. The launcher only routes the requester to a form. Approvals, escalations, and SLA are handled by the task template, the project workflow, and the HelpDesk settings behind the link.
- No public page. A launcher lives inside an Easy8 dashboard and requires a login. It cannot be published as a public page for anonymous visitors.
- No form editor in the launcher. The fields of the request form come from the task template. Edit them in the template settings.
- No import from Jira Service Management. Portal groups and request types from an existing Jira Service Management project are not imported or synchronised. Rebuild the structure in the launcher.
- Link visibility follows the underlying object, not the launcher. Links are not filtered per user role in the launcher configuration.
- Deleting a group or a link does not affect the tasks already created through it.
Summary
- Request Launcher is the request hub with groups and links; the Request Launcher widget displays a chosen launcher on a dashboard.
- Launchers are managed centrally, so one launcher can serve several dashboards and any change applies to all of them.
- Managing launchers is controlled by the global permissions Manage own request launchers and Manage all request launchers. End users only consume the result.
- Each link opens either a URL in a new tab, or a task form prefilled from a task template.
- For HelpDesk users, the project set on the task template decides whether the template is applied and whether the user can choose the project.
- The launcher routes requests; workflow, approvals, and SLA stay in the task templates, projects, and HelpDesk settings behind it.
Related articles