How to create and manage groups in Redmine
Administrators can create and manage user groups in Redmine to save time in management of project memberships. Groups can be added to projects just like individual users, with the same role assignments. When a user is added to a group, they automatically inherit all of the group’s permissions. Expectedly, removing user from a group takes away their permissions previously gained from the group.

Table of contents
A practical guide to using groups in Redmine projects
What are groups in Redmine?
Creating Redmine groups
Adding members and assigning projects
Managing user groups in Redmine
REST API for Groups
Working with groups
Working with a single group
Group memberships
Remove user from group
Benefits of using groups in Redmine
Why upgrade Redmine to Easy8 Redmine Edition?
TL;DR
Managing user groups in Redmine helps administrators save time by assigning roles and permissions to entire teams at once, making project access and user management more efficient.
A practical guide to using groups in Redmine projects
Redmine is a powerful open-source project management tool that allows administrators to organize users efficiently using groups. Groups simplify the administration of user permissions and project memberships by enabling bulk assignment of roles and privileges.
This guide provides a detailed expert walkthrough on creating and managing groups in Redmine to help administrators streamline user management within their projects.
What are groups in Redmine?
In Redmine, groups are collections of users created by administrators. Instead of adding users individually to projects, groups can be added as project members with assigned roles, inheriting permissions for all group members.
This approach is ideal for managing teams such as developers, QA, or management groups, especially in installations with many users.
Redmine groups behave like regular users in terms of project membership and roles, allowing Redmine administrators to efficiently assign access rights and manage project collaboration.
Administrators can create and manage user groups in Redmine to save time in management of project memberships. Groups can be added to projects just like individual users, with the same role assignments. When a user is added to a group, they automatically inherit all of the group’s permissions. Expectedly, removing user from a group takes away their permissions previously gained from the group.
Creating Redmine groups
To create a group, follow these steps:
- Go to Administration
- Click Groups
- Click New Group
- Enter the group name in the Name field
- Click Create
Adding members and assigning projects
To add members to a group, follow these steps:
- Go to Administration >> Groups
- Click the name of the group you want to edit
- You will see three tabs: General, Users, Projects
- General - Change the group name
- Users - manage members of the group - click Add to confirm
- Projects - Select a projects where th groups should be a part of, assign a role, click Add
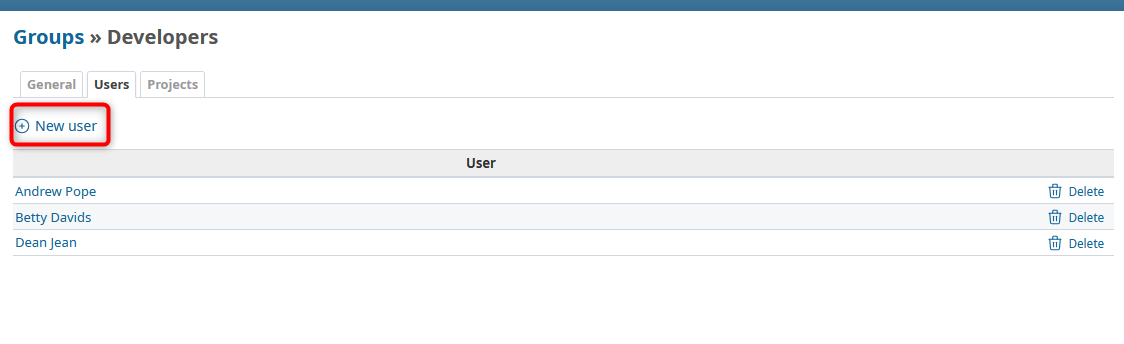
Example of group users tab
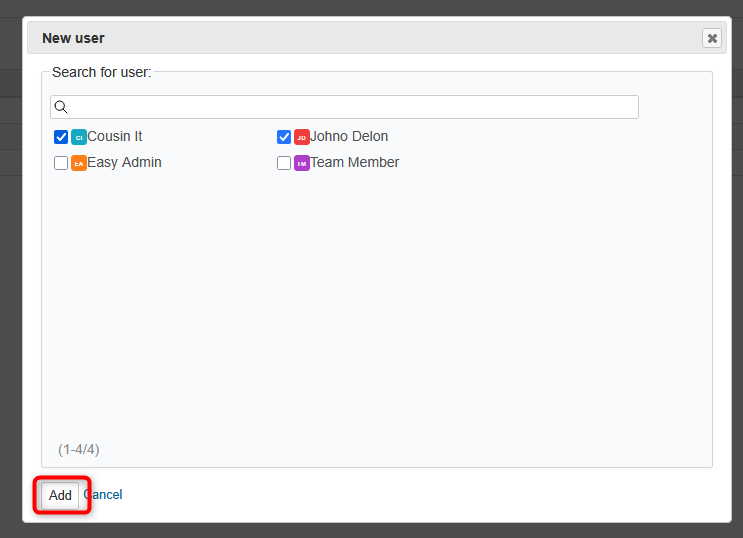
Adding members to a group
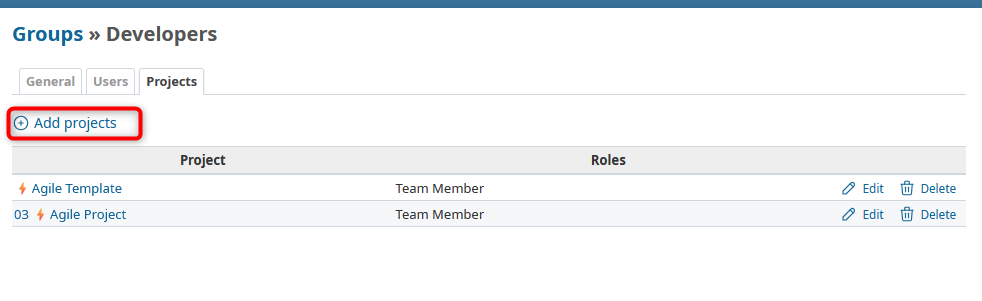
Example of group project tab
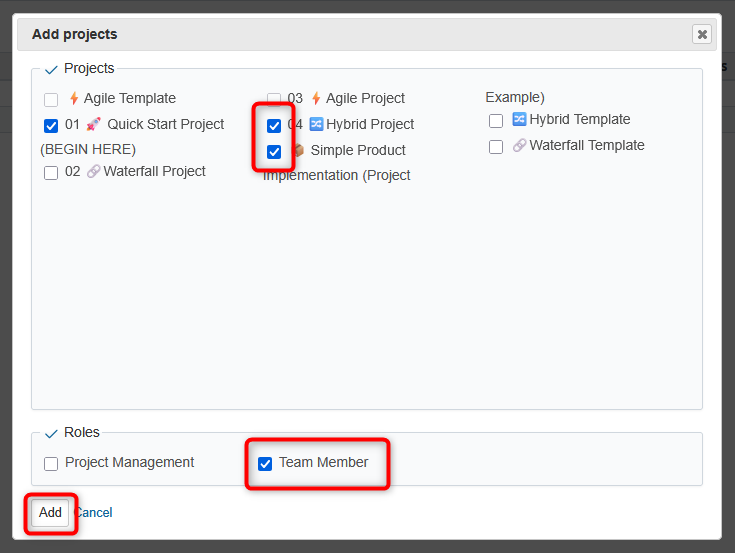
Assigning a group membership into projects (from the group setting)
Managing user groups in Redmine
Go to: Administration > Groups
Here, administrators can manage groups of Redmine users.
Note: Adding users to groups simplifies role management, since entire groups can be assigned to projects with the same roles as individual users.
Each group is listed by its name and number of members. You can also filter groups by keyword (e.g., group name).
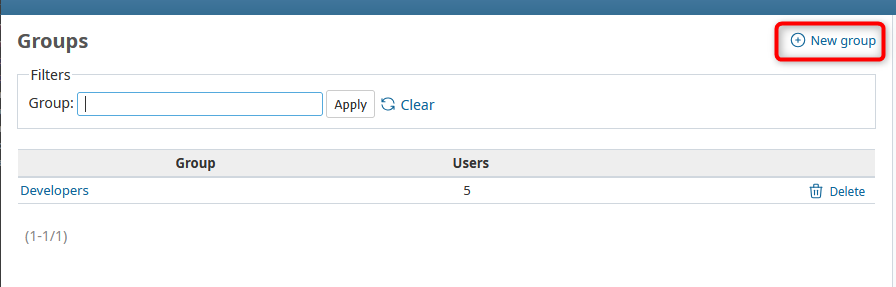
Creating new group in Redmine
To create a new group, click New Group, enter a name, and click Create or Create and Continue if you want to add another group immediately.
To edit a group, select it from the list. You can change the group name, add users, or assign projects. Each action is managed in the corresponding tab.
To add users to a group, open the group’s Users tab, click New User, and select one or more users to add. When a user is added to a group, they automatically inherit all of the group’s permissions (e.g., project roles).
REST API for Groups
Working with groups
Route: /groups.:format
GET
Returns the list of groups.
This endpoint requires administrator permissions.
Example:
GET /groups.xmlResponse:
<groups type="array">
  <group>
    <id>53</id>
    <name>Managers</name>
  </group>
  <group>
    <id>55</id>
    <name>Developers</name>
  </group>
</groups>
POST
Creates a group.
This endpoint requires administrator permissions.
Parameters:
- group (required): a hash of group properties, including:
- name (required): the group name
- user_ids: IDs of the group’s users (an empty group is created if not provided)
Example:
POST /groups.xml

<group>
  <name>Developers</name>
  <user_ids type="array">
    <user_id>3</user_id>
    <user_id>5</user_id>
  </user_ids>
</group>
POST /groups.json

{
  "group": {
    "name": "Engineers",
    "user_ids": [3, 5]
  }
}
Response:
- 201 Created: group was created
- 422 Unprocessable Entity: group was not created due to validation errors (response body contains error messages)
Working with a single group
Route: /groups/:id.:format
GET
Returns details of a group.
This endpoint requires administrator permissions.
Parameters:
- include (optional): a comma-separated list of associations to include in the response:
- users
- members
Example:
GET /groups/20.xml?include=usersResponse:
<group>
  <id>20</id>
  <name>Developers</name>
  <users type="array">
    <user id="5" name="John Smith"/>
    <user id="8" name="Dave Loper"/>
  </users>
</group>
PUT
Updates an existing group.
This endpoint requires administrator permissions.
DELETE
Deletes an existing group.
This endpoint requires administrator permissions.
Group memberships
Route: /groups/:id/users.:format
POST
Adds an existing user to a group.
This endpoint requires administrator permissions.
Parameters:
- user_id (required): ID of the user to add to the group
Example:
POST /groups/10/users.xml

<user_id>5</user_id>
Response:
200 OK: User was added to the group
Remove user from group
Route: /groups/:id/users/:user_id.:format
DELETE
Removes a user from a group.
This endpoint requires administrator permissions.
Example:
DELETE /groups/10/users/5.xmlResponse:
200 OK: User was removed from the group
Benefits of using groups in Redmine
- Simplified permission management: Assign roles once per group instead of per user, saving time and reducing errors.
- Consistent access control: Ensure all users in a group maintain uniform permissions across projects.
- Scalability: Efficiently handle large numbers of users by managing them in groups.
- Improved collaboration: Quickly set up project teams and adjust memberships as needed.
Why upgrade Redmine to Easy8 Redmine Edition?
Managing a large number of users, groups, and project memberships in Redmine can become a performance bottleneck—especially at scale. These bulk operations may even overload your application server or risk corrupting database entries.
In Easy8 Redmine Edition these operations are done asychronously (on the background), which prevents from overloading the server or corrupting the membership data in the DB. Try Redmine upgrade—Easy8 Redmine Edition!

Frequently asked questions
How do you add members in Redmine?
To add members to a project in Redmine, follow these expert steps:
- Navigate to the specific project where you want to add members.
- Click on the Settings tab in the project menu.
- Select the Members tab within the project settings.
- Click the New member button.
- In the new member form, select the users you want to add by typing their names in the User field.
- Choose the appropriate Role(s) for the selected user(s) (e.g., Manager, Developer, Reporter).
- Click Add to confirm and add the user(s) as project members.
These added members will now have the permissions associated with the roles assigned within that project.
If you want to add multiple users at once, you can do so by selecting multiple users before clicking Add, or add a whole group as a member if you have groups set up (see group management).
This process can be done by Redmine administrators or project managers who have the necessary permissions to manage project memberships.
Is Redmine still used?
Redmine remains an actively maintained open-source project management tool with regular releases and a vibrant community, evidenced by version 6.0.5 being released just two months ago and nearly 19,000 commits on its GitHub mirror.
Despite its niche position, 2.9 % of developers reported using Redmine in the 2024 Stack Overflow Developer Survey, demonstrating a steady, if modest, user base among professional teams.
The platform’s ecosystem continues to grow, with community analysis in 2024 registering 60 new plugins and active contributions across forums and the core codebase. Moreover, over 250 user reviews on G2 in the past quarter reflect ongoing deployment and feedback from organizations of various sizes.
Since its launch in 2006, Redmine has been adopted across diverse sectors—including software development firms, educational institutions, government agencies, and non-profits—thanks to its flexible, Rails-based architecture and extensive customization options. Notably, even the Ruby language project itself uses Redmine for its issue tracking, further validating its suitability for technical teams that require deep control over workflow and data.
What is the difference between Jira and Redmine?
Jira is a proprietary, enterprise-grade issue tracking and agile project management platform developed by Atlassian, featuring built-in Scrum and Kanban boards, advanced reporting, and seamless integration with the wider Atlassian ecosystem under commercial licensing.
Redmine is a free, open-source, Ruby on Rails–based project management and issue-tracking tool emphasizing self-hosting flexibility, hierarchical projects, built-in Gantt charts and calendars, and extensibility through community-driven plugins.
As a result, organizations seeking polished UX, enterprise support, and rich analytics tend to choose Jira despite licensing costs, while teams prioritizing customizability, budget-friendliness, and open-source control often opt for Redmine.
Related articles

Redmine 6 is out: Is it worth updating?
The open-source project management tool Redmine has released its version 6, bringing several technical updates and improvements. Let's look at what's new regarding this Redmine upgrade.

How Docker improves the security of on-premises solutions
Easy Software is pleased to announce official support of on-premises solution via Docker solutions. This article focuses on the security benefits. I strongly believe you will find them worth the smaller effort of migrating from the legacy solution.

The most popular Redmine themes
The Redmine platform is a flexible and powerful tool for business and project management. One of the prime features that provide this adaptability or flexibility is the opportunity to use a Redmine theme to modify the platform’s visual aspect and enhance its functionality and usability. The following is a list of popular Redmine themes that users use today.